
An evite is an electronic invitation: you choose a design, add your event details, send it to guests by email or text message, and collect the replies in one place. This guide walks through sending one with Greenvelope, a digital invitation platform with animated envelopes, customizable templates, and built-in RSVP tracking. Evite is also the name of a separate invitation company, and our guide to the best Evite alternatives compares the platforms if that is the question you came with.
Sending the invitation is one of the best parts of planning an event. It is where your guests first see what you are throwing. Here is the whole process in six steps, plus what to do once the cards are out.

Create Your Online Invitation
Design and send elegant, customizable digital invitations with real-time RSVP tracking — no time limit, no credit card required.
Get startedHow to Send an Evite with Greenvelope
Greenvelope offers thousands of elegant digital invitations spanning everything from birthday parties and anniversaries to wedding invitations and company celebrations. You can send them to guest email addresses and phone numbers, or share them through a public link. Here’s how to send an evite using Greenvelope in six easy steps. To see how other services handle email delivery, read our comparison of the best email invitation services.
1. Choose a Design
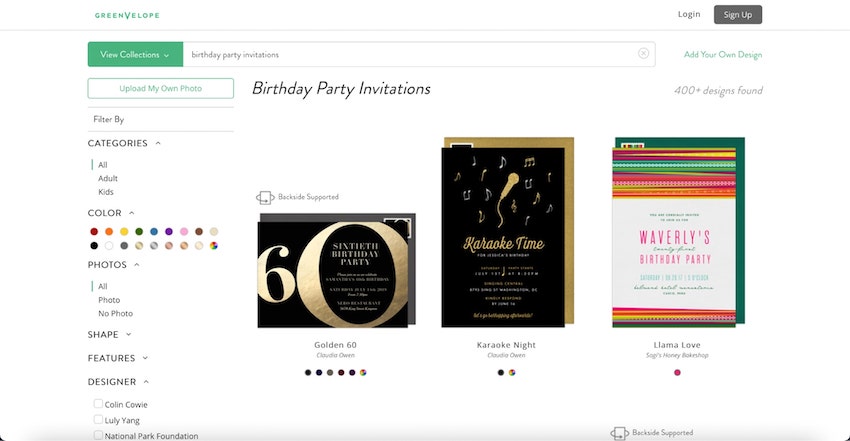
Start on the design page. Use the “view collections” tab to find a particular type of invitation, such as wedding invitations, baby shower invites, or birthday party invites, and the filters on the left to narrow by color palette, shape, features, and style. There’s also a button for uploading your own design if you want an evite that is entirely your own.
2. Edit the Evite
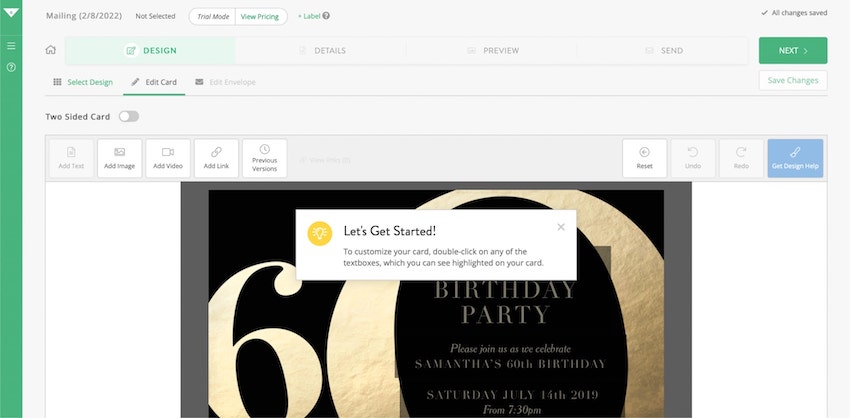
Found the perfect evite template for your event? Click “start customizing” and you’ll be taken to the editor view where you can edit and add text, photos, and videos to the design. Upload a photo to make it a photo ecard, or add a video to make it more engaging.
This is also where you customize the digital envelope your card arrives in. Choose from stationery options including felt, metallic, deckled, and vellum styles, adjust the color palette, and add a lining, stamp, or wax seal to match the card inside.
3. Customize the Mailing Details in Greenvelope
Next, set the mailing details. You’ll start by choosing the type of mailing from the following options:
- Invitation and RSVP: Includes the invite plus Greenvelope’s built-in RSVP tracking and survey questions, so you can track guest menu selections, song ideas, and any other questions you ask via the survey question tool
- Save the Date: A notification card for an upcoming event that doesn’t include RSVP tracking
- Thank You Note: Standard or customized thank you cards without RSVP tracking
- Card/Announcement: A greeting card or announcement of a special occasion that doesn’t need any RSVP tracking
From there, Greenvelope walks you through the party details: event name, venue name, venue address, and the date and time. You can also add music, link a gift registry or event website, and allow card personalization for each guest. On an invitation mailing, this is also where you set your RSVP deadline: Details, RSVP Page, Basic RSVP Info, then toggle the date on. Work back from the date your caterer or venue needs a final count, leaving yourself room to follow up.
4. Preview and Test the Evite
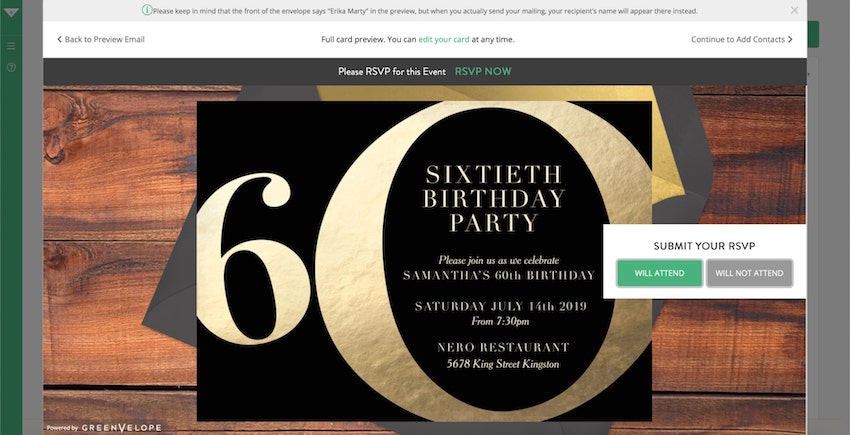
The preview panel plays the arrival the way a guest sees it: the envelope appears first, front and back, showing any stamp or wax seal you added, then opens to reveal the card inside.
Read it as a guest would, in this order: the event details (names, dates, times, and the venue address), any links you added, how the card reads on a phone, and the RSVP form itself, including the deadline and any survey questions. Then send yourself a test card before you send to the list. Your own account is added to the guest list as a contact by default, so you can click “Send” next to it and open the invitation the way your guests will, in a real inbox and on a real phone. Devices and email apps differ, so a test is worth the two minutes.
5. Send the Evite by Email, Text, or Shareable Link
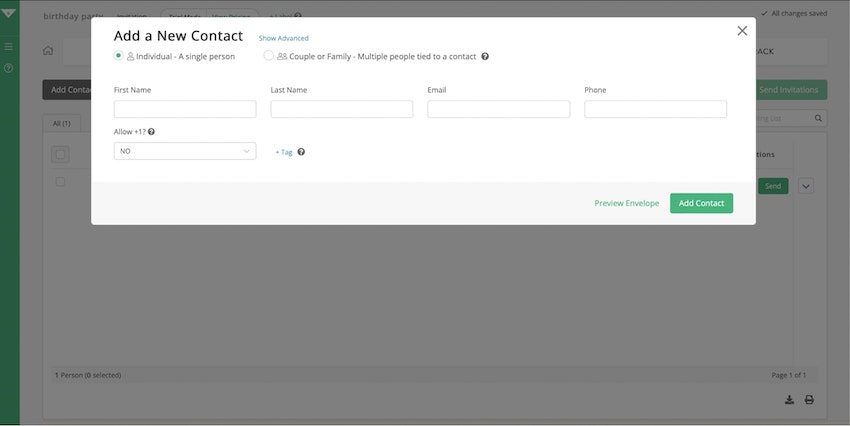
There are two ways to get the card in front of guests, and they work differently.
Send to named guests. Anyone you invite by name needs a contact record, so start by building your list: add contacts manually, or import them from your email provider (Gmail, Yahoo Mail, etc.), your Greenvelope Address Book, or a spreadsheet. This is also where you set whether guests get a plus one and add tags to sort the list into groups like family and colleagues. From there you have two options:
- Let Greenvelope deliver it: each contact gets their own copy by email or, in supported countries, by text message. For a text, put the guest’s mobile number in the contact’s Phone field: if that contact has no email address, the card sends by text when you complete the send, and if an email address is there too, choose text instead of email. In the Send step, select the contacts you want and click “Send Invitations”. This route keeps delivery, opens, and RSVPs attached to the right person on your list.
- Deliver one guest’s link yourself: to send through your own WhatsApp, Messenger, or text thread, open the dropdown on the far right of that contact’s row and click Copy Link / Send Plain Text. That link belongs to one contact or household. Posting it in a group chat means everyone who opens it lands on that household’s card, and any RSVP submitted there is recorded against that one contact.
Or open it up with a public link. When open registration and forwarding are welcome, sharing works differently: in the Send step, click “Share URL” to create one public link, then post it in a group chat or on Facebook, X, your website, or in your newsletter. You do not need to add guests beforehand; they join the guest list when they register. Those registrations and replies land in the same event dashboard, though the link will not tell you who received it or who has not replied, so it suits a wider circle rather than a fixed list. Turning off the “Enable Sharing” toggle disables the link and stops further registrations.
One account note: Trial Mode has no time limit and sends to up to 10 people, but creating a shareable link and copying a guest’s personalized link both arrive with a paid package. For a closer look at how the routes compare, our guide to the best way to send digital invitations covers email, text message, and a shareable link side by side.
6. Track RSVPs and Guest Responses
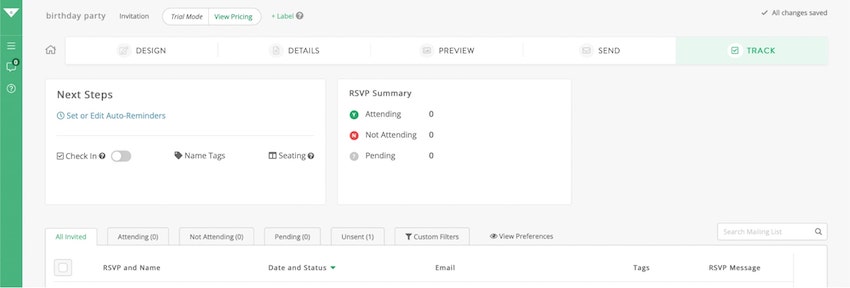
Greenvelope’s tracking dashboard shows who is attending, who can’t make it, and who you’re still waiting on. It is also where you create name tags, set up seating charts, and read survey responses. For the mechanics behind every one of those replies, from custom questions to meal choices to reminder timing, our guide to collecting RSVPs online walks through the system.
Three situations look similar on the dashboard and need different fixes:
- Undeliverable: the card is in the Undeliverable tab of the Send step, which means that delivery attempt failed. Open the dropdown beside the contact and click View Guest History for the bounce response code, correct the address, and resend, or switch that guest to a text send or their personalized card link.
- Sent but not opened: no open has been recorded yet. Check for an undeliverable status before following up. The Opened tab records that the card was opened, not that the guest read the date and venue, and never that they responded. For contacts with no open, resend to selected guests by hand, or turn on the Delivery Optimizer under Details, Information, Advanced Options, which resends unopened invitations three days after the initial send and leaves everyone who already opened alone.
- No RSVP yet: use reminders. RSVP reminders go to any contact who has not yet responded, whether or not an open is recorded, with yes and no links in the email; event reminders go only to guests already marked attending, closer to the day.
Delivery and open records exist for the email and text routes. A public Share URL gives you registrations instead, so follow up with those guests by name once they register.
After Sending: Fix, Notify, Verify
When event details change, update the invitation, notify affected guests, and verify their responses.
1. Fix the card and the details. You can go back and edit your card for up to five months after you send it, from the Design step, Edit Card section, and that update reaches the cards guests already received. Correct the event name, date, time, and venue in the same Details step where you entered them, and if the reply-by date is moving, change the RSVP deadline itself under Details, RSVP Page, not only in the message you are about to write.
2. Notify the guests the change affects. Send affected guests a message explaining the change. Greenvelope’s messaging feature sends a message by email or SMS to the contacts you select, from the Send step or the Message Center. It comes with a paid account, which starts with 500 text messages, and texting is available in supported countries. A text from your own phone works too, if that is the easier way to reach someone. Say what the detail was, what it is now, and what you need back. Here is a rescheduling example to adapt:
Subject: New date for [Event name]
Hello [Guest first name],
[Event name] was scheduled for [original day, date, and start time] at [original venue]. It has moved to [new day, date, and start time] at [new venue and street address].
[Everything else about the event is the same.]
Your invitation has been updated with the new details. Please open it and confirm whether you can attend on the new date by [new reply-by date], even if you replied for the original date, so we have an accurate count for [the caterer, the venue, or your own reason].
If you have any trouble updating your response, reply to this message or reach me at [phone or email].
Thank you,
[Host name]
3. Verify what comes back, and what is still scheduled. Ask guests to reconfirm for the new date and verify those confirmations before relying on your headcount: note who responds after your message, and record confirmations that reach you by phone or text on the guest’s existing entry in the Track step. Resist clearing everyone’s responses, which deletes the RSVP data you already have and isn’t available for guests who registered through a public link or paid for a ticket. Review scheduled reminders under Track, Set or Edit Auto-Reminders and adjust them to match the revised event.
Keep RSVPs open while you are collecting confirmations for a replacement date. It is a cancellation, or a postponement with no new date yet, that calls for stopping replies: Greenvelope’s guide to handling a cancelled or postponed event covers closing RSVPs by setting the capacity below your current attending count, adding an eye-catching notice to the card image and the top of the details page, and cancelling reminders still scheduled to go out.
Benefits of Using an Evite
Digital invitations spare you the parts of the process nobody enjoys. There is no print run to proof and pay for, no envelopes to address and stuff, no stamps, and no trip to the post office, which also means less paper spent on an event that lasts a day. You choose a design, customize it, and send.
They are also easier to live with once they are out. Adding a guest takes a moment, a change of plan means editing the card rather than reprinting it, and telling guests what changed takes the message covered above instead of a round of phone calls. Greenvelope pairs that with transparent pricing and flexible invitation plans for any size of event.
Get Excited for Your Event With Evite Inspiration

From a bridal shower or kids birthday party to a bat mitzvah, a fundraiser, or a backyard tea party, the six steps above are the same. Get inspired by our digital event invitations, browse our Stationer’s blog for party themes and invitation wording tips, or watch a short intro video and start building your evite.